Adding Links to Your Document


In this lesson, you will learn how to include links in your HTML document.

You will need three windows open on your screen at this time. A Netscape window displaying this tutorial, an experimental window to view your HTML document, and a window in which you will type the HTML document.

Linking to Local Documents

For this part of the tutorial you will create three HTML documents: one document containing links to the other two.
All three of these documents will be local documents because you will be saving them to your diskette or hard drive.

Create an HTML document that displays your first name only.
Save this file and call it first name .

Create another HTML document that displays your last name only.
Save this file and call it last name.

Lastly, you will create a document which will have two hyperlinks in it. The first hyperlink will link you to your first name file and the second hyperlink will link you to your last name file.

It's time to create the third HTML document which will contain the links to your first name file and your last name file.
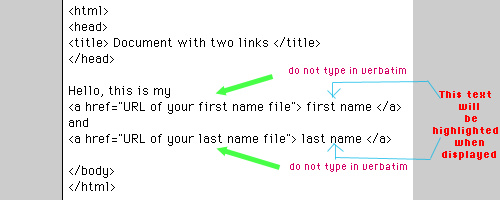
Type in the source that follows, but do not type it in word for word. You must fill in the URL's of your first name and last name files, between the double quotes.


Observe the new tags:
<a href=" filename">and </a>

These tags make up the two pieces of a link.
The <a href=" filename"> tag is the first part of the link. The <a href=" filename"> tag signifies a link is coming and the file name is the target of the link (where you will jump to).

The text between the <a href=" filename"> tag and the closing tag </a> is the second piece of the link. This text will be highlighted in your document. When the reader clicks on this highlighted text, they will jump to the target (i.e. the filename you typed in the <a href=" filename"> tag).

In the above example first name and last name will be highlighted in your third document and will link you to the files first name and last name.

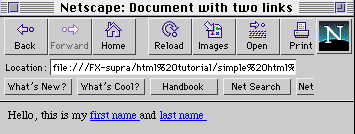
That is, your third HTML document should look like this:


Save this file and call it links .
Click on the experimental window and view the file links .
Click on the two links to see if you have been successful. If something has gone wrong check your syntax carefully and make sure you typed in the correct URL's.

Creating a Graphical Link


You can use a picture as a link.

In the tutorial we will use the flower as a graphical link.
When you click on the flower, you should jump to the file containg your first name (first name). To create this graphical link you need to download the image of the flower and remember where you saved it.

Download the flower image below and save it to your diskette or hard drive. Remember where you saved it to.


Click on the window containing your HTML document links . Within the source, replace the text 'first name' that is contained between the first set of <a href=" filename">and </a> tags, with the following:

and save your changes.

You have just substituted the text 'first name' with your flower image.

Click on your experimental window and open your links document. The image of the flower should appear and it should have a border line around it, which indicates that it is a link.
Click on your new graphical link and see if it works.

Next Topic: Creating Tables
Main Menu